Receiving Voice Input in a Notification
Android - Building Apps for Wearables/Adding Wearable Features to Notifications 2014. 8. 13. 14:28알림에 음성 입력 수신
만약 당신이 이메일 답신과 같은 텍스트 입력 액션이 포함된 휴대용 장치의 알림을 갖고 있다면, 일반적으로 휴대용 장치에서 텍스트 입력을 위한 액티비티로 작동해야 한다. 하지만, 알림이 키보드 입력이 없는 웨어러블 장치에서 나타나면, 사용자가 응답을 결정하거나 RemoteInput을 사용하여 미리 지정된 텍스트 메시지를 제공할 수 있다.
사용자가 음성 응답이나 이용가능한 메시지들중 하나를 선택할 때, 시스템은 알림 액션을 위해 당신이 명시한 Intent에 텍스트 응답을 붙이고 당신의 휴대용 장치 앱에 인텐트를 전송한다.


메모: 안드로이드 에뮬레이터는 음성 입력을 지원하지 않는다. 웨어러블 장치를 에뮬레이터에서 사용할 때, AVD상에서 하드웨어 키보드 존재를 활성화하여 응답을 입력할 수 있다.
음성 입력 정의
음성 입력 지원 액션을 만들기 위해, 당신의 알림 액션에 추가할 수 있도록 RemoteInput.Builder 인스턴스를 생성하라. 이 클래스의 생성자는 시스템이 음성 입력을 위해 키로 사용하기 위한 문자열을 받아들이고, 추후 휴대용 단말의 앱에서 문자열 입력을 받기 위해 사용한다.
예를들어, 여기에 음성 입력 프롬프트에 관한 사용자 레이블을 제공하는 RemoteInput 객체를 생성하는 방법을 설명한다:
// Key for the string that's delivered in the action's intent
private static final String EXTRA_VOICE_REPLY = "extra_voice_reply";

String replyLabel = getResources().getString(R.string.reply_label);

RemoteInput remoteInput = new RemoteInput.Builder(EXTRA_VOICE_REPLY)
        .setLabel(replyLabel)
        .build();
미리 지정된 텍스트 응답 추가
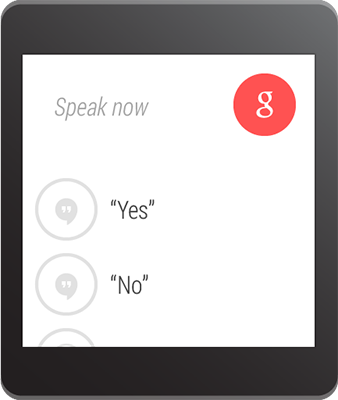
음성 입력을 허용할 뿐만 아니라, 당신은 사용자가 빠른 답변을 선택할 수 있도록 5개의 응답 텍스트 제공할 수 있다. setChoices()를 호출하고 그것을 문자열 배열로 전달하면 된다.
예를들어, 리소스 배열에서 몇가지 응답들을 정의할 수 있다:
res/values/strings.xml
<?xml version="1.0" encoding="utf-8"?>
<resources>
    <string-array name="reply_choices">
        <item>Yes</item>
        <item>No</item>
        <item>Maybe</item>
    </string-array>
</resources>
그 다음, 문자열 배열로 부풀리고(inflate) RemoteInput에 추가하라:
public static final EXTRA_VOICE_REPLY = "extra_voice_reply";
...
String replyLabel = getResources().getString(R.string.reply_label);
String[] replyChoices = getResources().getStringArray(R.array.reply_choices);

RemoteInput remoteInput = new RemoteInput.Builder(EXTRA_VOICE_REPLY)
        .setLabel(replyLabel)
        .setChoices(replyChoices)
        .build();
알림 액션으로 음성 입력을 추가
음성 입력을 설정하기 위해, addRemoteInput()라는 하나의 액션을 사용하여 RemoteInput 객체에 부착한다. 그러면 알림으로 액션을 적용할 수 있다. 예를들면:
// Create an intent for the reply action
Intent replyIntent = new Intent(this, ReplyActivity.class);
PendingIntent replyPendingIntent =
        PendingIntent.getActivity(this, 0, replyIntent,
                PendingIntent.FLAG_UPDATE_CURRENT);

// Create the reply action and add the remote input
NotificationCompat.Action action =
        new NotificationCompat.Action.Builder(R.drawable.ic_reply_icon,
                getString(R.string.label, replyPendingIntent))
                .addRemoteInput(remoteInput)
                .build();

// Build the notification and add the action via WearableExtender
Notification notification =
        new NotificationCompat.Builder(mContext)
                .setSmallIcon(R.drawable.ic_message)
                .setContentTitle(getString(R.string.title))
                .setContentText(getString(R.string.content))
                .extend(new WearableExtender().addAction(action))
                .build();

// Issue the notification
NotificationManagerCompat notificationManager =
        NotificationManagerCompat.from(mContext);
notificationManager.notify(notificationId, notification);
당신이 이 알림이 공지할 때, 사용자는 "응답" 액션 버튼을 보기 위해 왼쪽으로 스와이프 동작을 할 수 있다.
문자열로 음성 입력 수신
당신이 응답 액션 인텐트로 선언 된 액티비티 내에서 사용자의 기록된 메시지를 수신하려면, getResultsFromIntent()를 호출하고, "응답" 액션 인텐트를 보내면 된다. 이 메소드는 문자열 응답을 포함한 Bundle로 반환한다. 그러면 당신은 응답을 얻기 위해 Bundle을 쿼리할 수 있다.
메모: 음성 데이터는 ClipData로 저장되어 있기 때문에, 음성 결과를 얻기 위해 Intent.getExtras()를 사용하지 마라. getResultsFromIntent() 메소드는 ClipData를 직접 처리하지 않고 연속된 문자를 수신하는 편리한 방법을 제공한다.
다음 코드는 이전 예제에서 EXTRA_VOICE_REPLY 키로 참조하여 사용되었던 인텐트 수신 후 음성 응답을 반환하는 방법을 보여준다:
/**
 * Obtain the intent that started this activity by calling
 * Activity.getIntent() and pass it into this method to
 * get the associated voice input string.
 */

private CharSequence getMessageText(Intent intent) {
    Bundle remoteInput = RemoteInput.getResultsFromIntent(intent);
        if (remoteInput != null) {
            return remoteInput.getCharSequence(EXTRA_VOICE_REPLY);
        }
    }
    return null;
}
'Android - Building Apps for Wearables > Adding Wearable Features to Notifications' 카테고리의 다른 글
| Stacking Notifications (0) | 2014.08.19 |
|---|---|
| Adding Pages to a Notification (0) | 2014.08.18 |
| Creating a Notification (0) | 2014.08.07 |
| Adding Wearable Features to Notifications (0) | 2014.08.05 |


